Registration
To maintain Guaranteed Housing status, all current undergraduate students must register for Room Selection. Below are step-by-step instructions with screenshots to show you how to complete the process.
Step 1: Log In
Log in to the Housing Portal using your UNI and password.
Step 2: Welcome
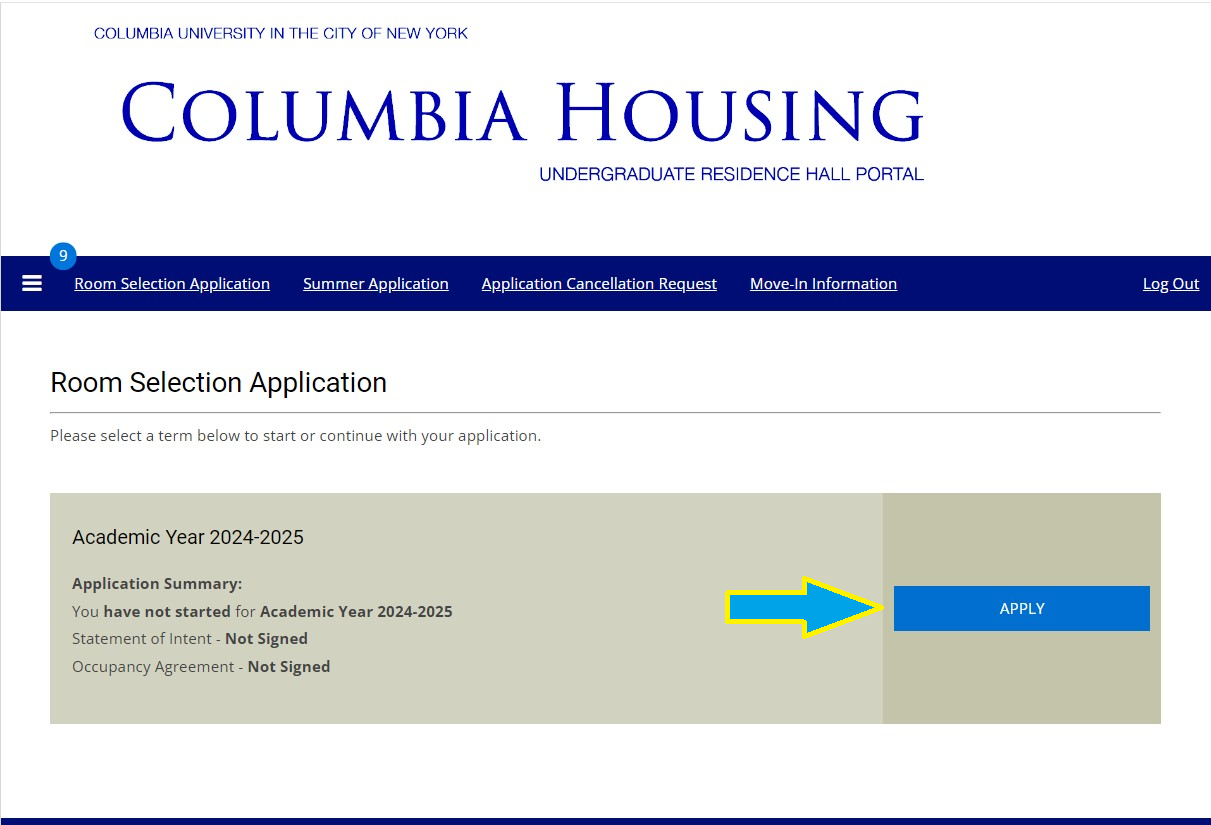
After logging in, you'll see the welcome screen below with information about the Room Selection Application process.
Step 3: Begin
Click the Apply button to begin. Carefully review and complete each page of the registration form.
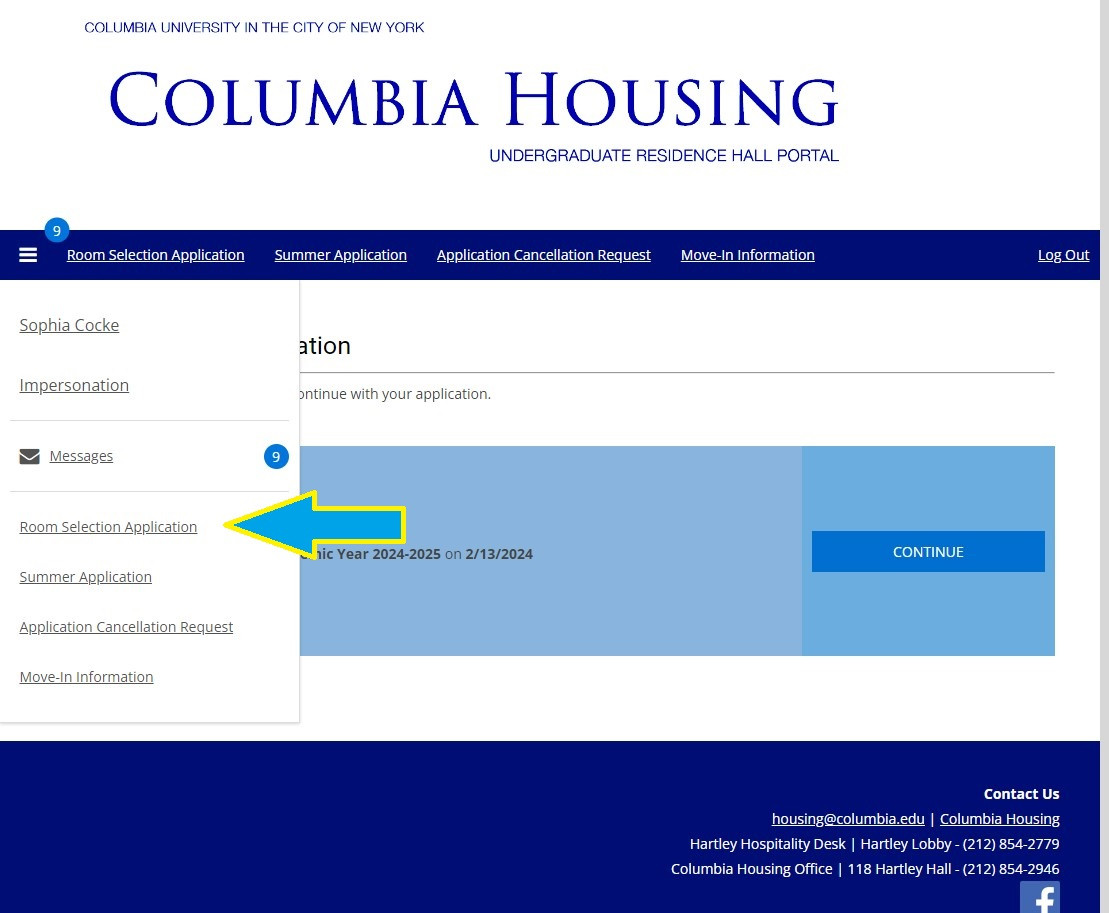
Note: No matter where you are in the Housing Portal, the Room Selection Application can be accessed by clicking the menu icon in the top left corner of the Portal navigation, then selecting Room Selection Application.
Step 4: Personal & Contact Details
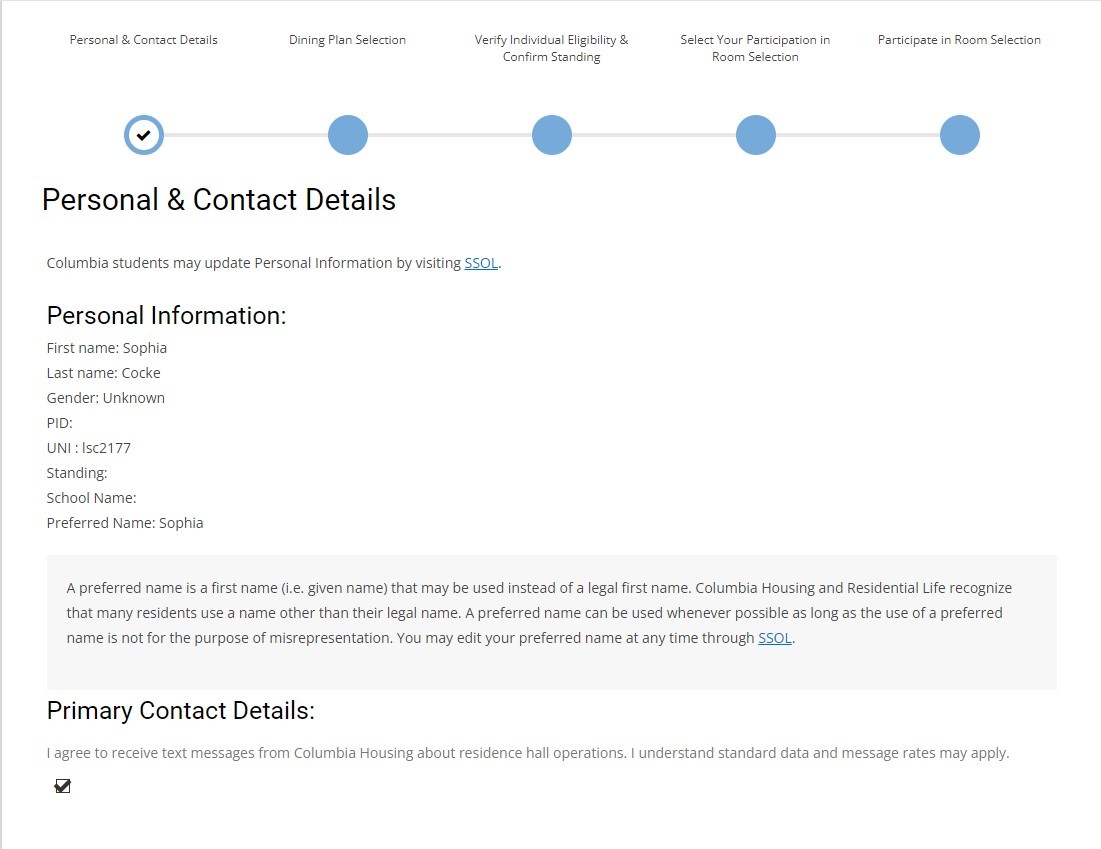
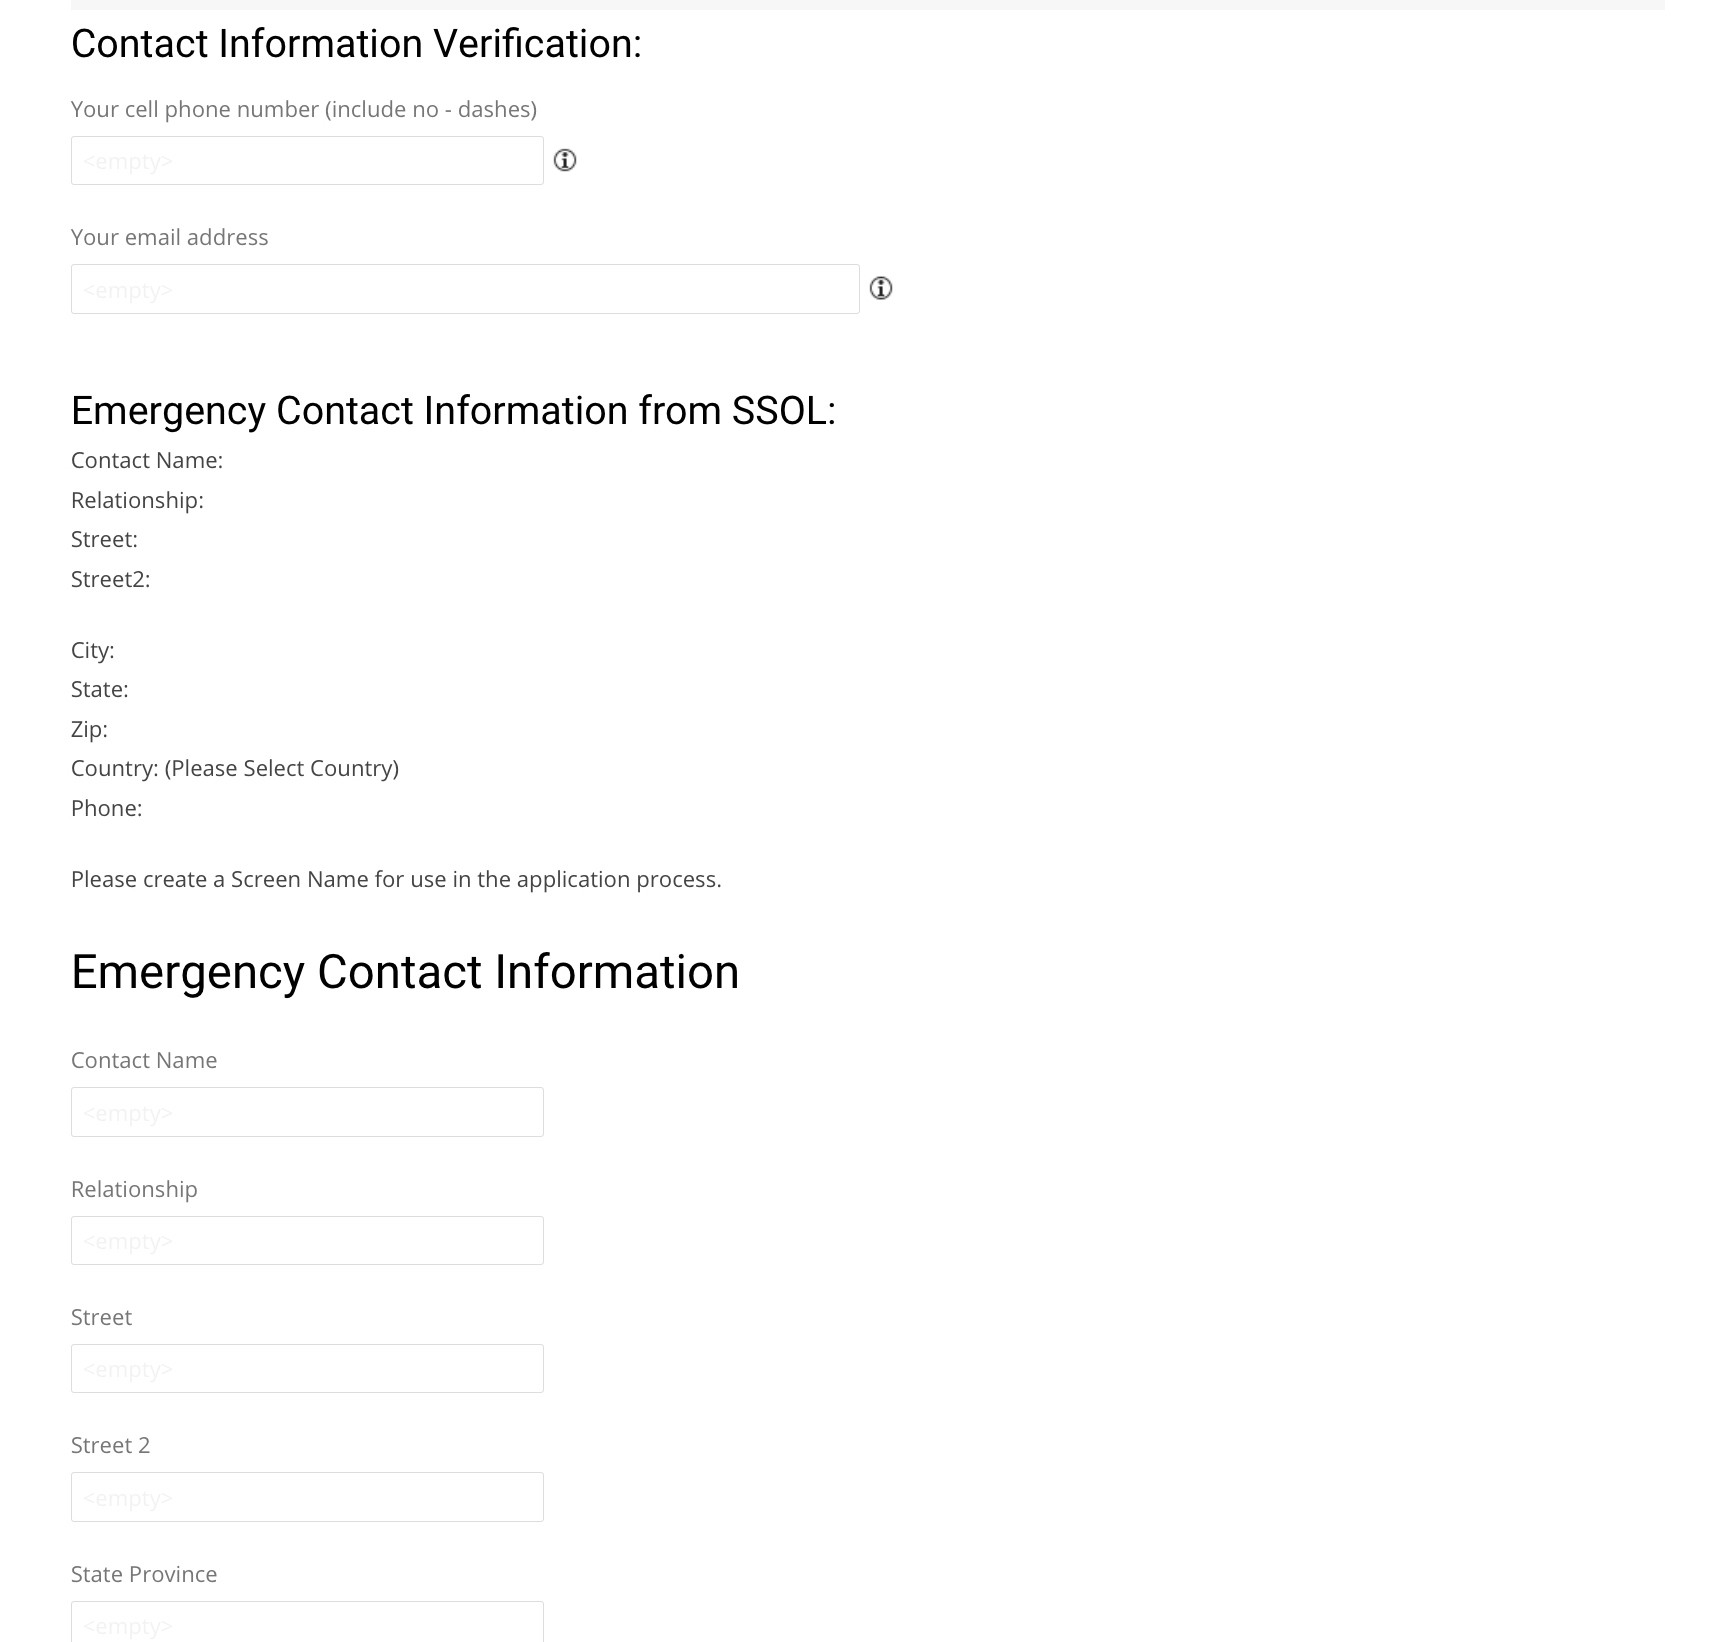
Complete the Personal & Contact Details section. If you already have a record in SSOL, that information will be pulled into the application automatically. If not, or if the required information is not in SSOL, you will need to complete any empty fields yourself before proceeding.
Please review and ensure this information is complete and accurate.
Also included in this section is Emergency Contact Information. These fields are mandatory so that we have a valid phone number of someone to call in case you are involved in an emergency situation.
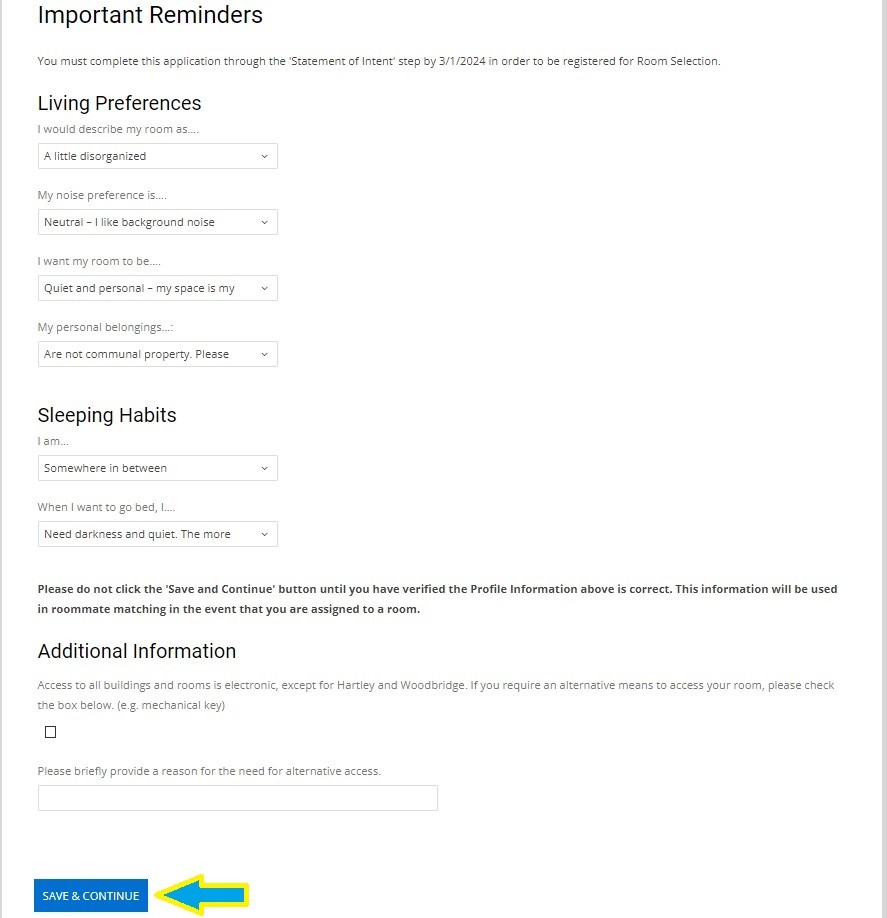
Step 5: Student Profile
The information in your student may already be saved from a previous Housing application. Please review your answers to confirm that they are still an accurate reflection of your living preferences and habits. If any fields are empty, you must complete them.
This information helps ensure that, if necessary, you can be paired with another student who fits your profile. It is especially important for students on the Guaranteed Assignment List.
Step 6: (Optional) Select a Dining Plan
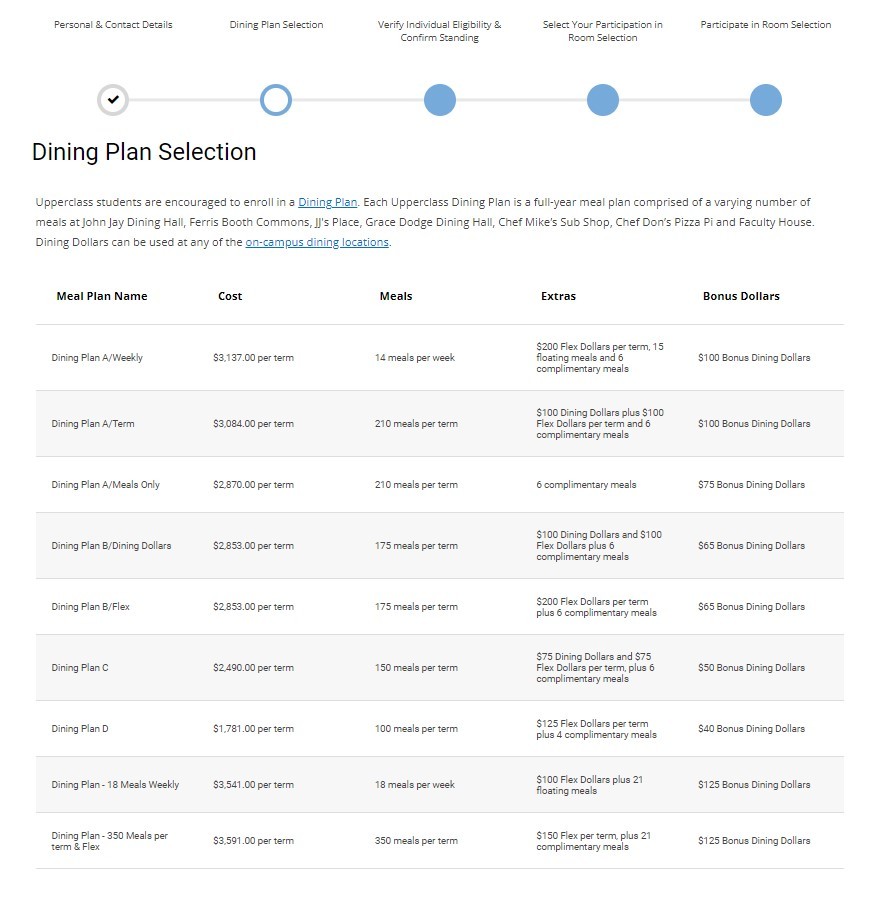
The Room Selection Application provides the opportunity to select a Dining Plan for the next academic year. A summary is provided on this screen for each plan, as well as links to a more detailed comparison to help you make the best decision.
Selecting a Dining Plan is optional, but please note that if you do not select a Dining Plan during this step, you will not be able to go back and choose one via the Housing Portal at a later date. You can always purchase a plan directly through via the Columbia Dining website.
Regardless if you select a plan during this step or not, click Save and Continue to proceed.
Step 7: (Optional) Dining Dollars & Flex
You can add additional Dining Dollars and Flex to your account in SSOL. Regardless if you add Dining or Flex, click Save & Continue to proceed.
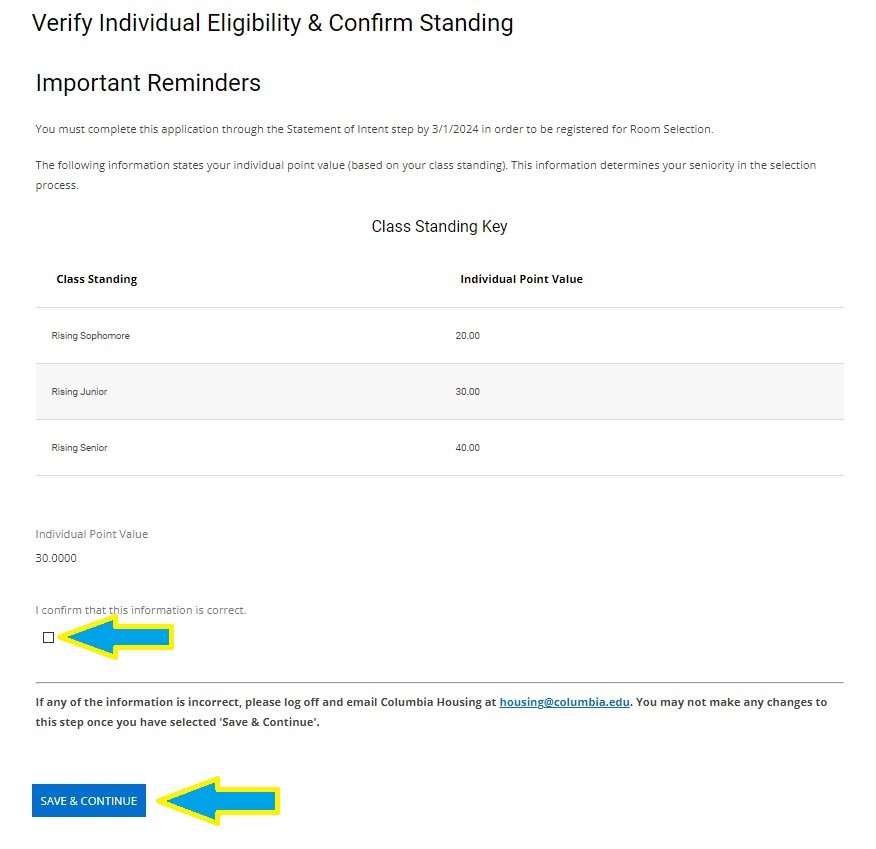
Step 8: Verify Eligibility
During this step, you will verify your individual eligibility for Room Selection and confirm your standing. This screen displays your individual point value for Room Selection and provides a series of checkboxes showing your eligibility to participate in Room Selection and your Guaranteed Housing Status.
If this information is correct, click Save & Continue to proceed.
Note: If the information displayed on this screen is not accurate, do not click Save and Continue. Exit the application process and contact Columbia Housing to make corrections. Afterwards you can return to the application process.
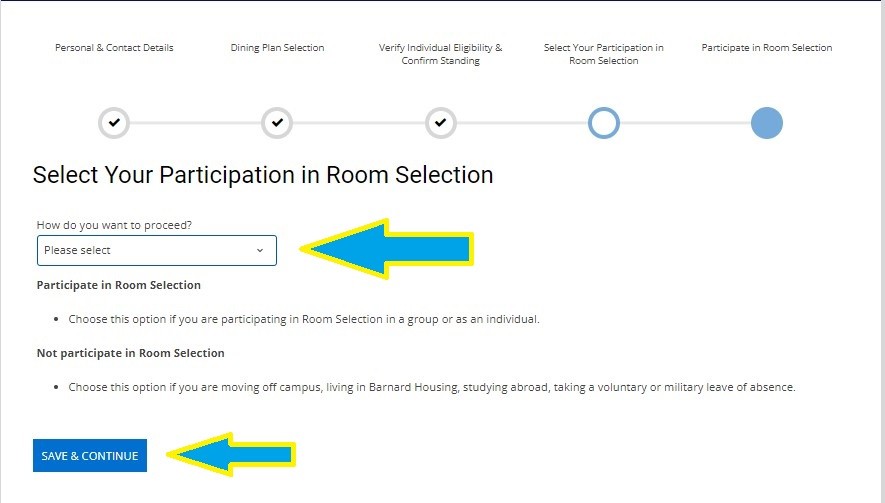
Step 9: Indicate Participation
This screen asks you to indicate whether or not you will be participating in the Room Selection process. Review the two options and select one from the drop-down menu.
Do not participate in Room Selection indicates students who are:
-
Studying abroad
-
Moving off campus
-
Living in Barnard Housing
-
Taking a Voluntary Leave
-
Taking a Military Leave
Participate in Room Selection indicates students who:
- intend to enter Room Selection as an individual or as a group and select their housing for the upcoming academic year
Once you've selected the appropriate options, click Save and Continue.
Pre-Assigned Students
This step is a different for students who fall into one of the following groups. Students who are part of one of these groups will see their upcoming room assignment on this screen and be asked to either verify it, or to contact Columbia Housing if there is an issue.
Special Housing includes students who will be:
-
Resident Advisers (RAs) or RA Riders
-
Members of fraternities and sororities (FSL)
-
Participating in Special Interest Communities (SIC)
-
Approved by Disability Services or Disability Riders
Note: The next screen will display a confirmation of your selection. Review to ensure it is correct, then click Save and Continue.
Step 10: Room Selection Groups
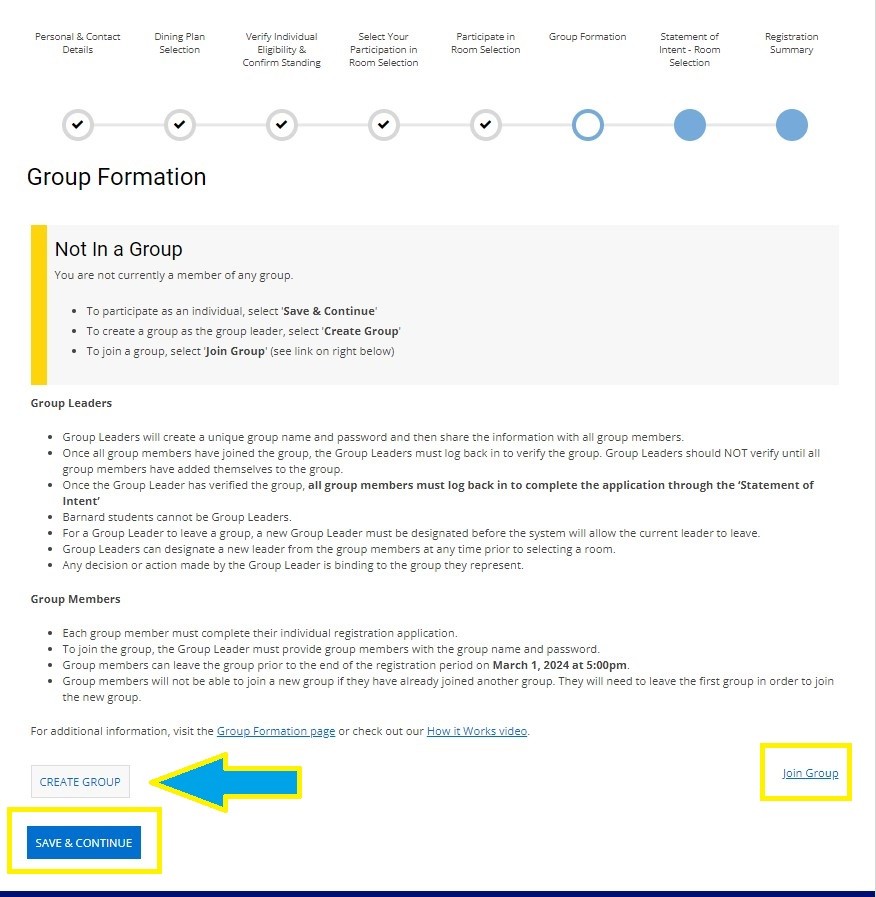
During this step, you will decide whether to continue as an individual or to participate as a group. The default participation for Room Selection is as an individual; if you would like to form or join a group, please follow the instructions below. It is to your advantage to participate as part of an even-numbered group as it will increase the likelihood of being able to select a room during your appointment time.
Review Room Selection Groups before completing this step in the Housing Portal.
To Continue as an Individual
If you want to continue as an individual, click Save & Continue. This will advance you through the process.
To Continue as a Group
- If you are the first member of your group to reach this page, you will need to form the group. Click the Create Group button. By creating the group, you become the Group Leader.
- If your group has already been created, click the Join Group text at the bottom right.
Creating a Group: Group Leader
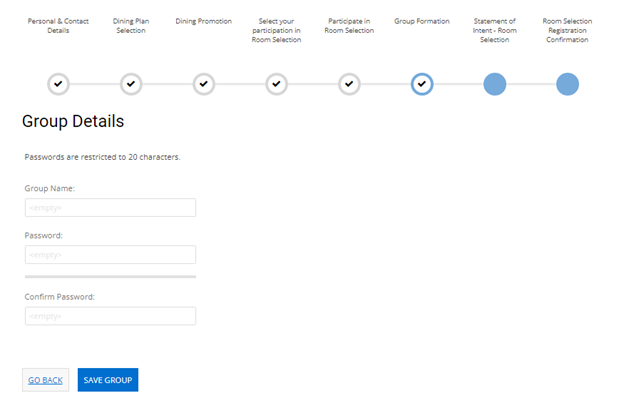
After clicking Create Group, the Group Leader will enter a name for the group and password. This group name and password must be shared with the other members of the group so that they may join the group.
- Group names are public to Housing staff and other students participating in Room Selection. Please be respectful when selecting a group name.
- Avoid using special characters in your group name. Special characters may not be recognized by the Portal which can cause issues when individuals attempt to find the group.
Click Save Group to create the group.
Note: Once all members have joined the group, the Group Leader needs to verify the group, after which the group is finalized. The Group Leader should not verify the group until all members have joined.
After Room Selection registration is over, no additional changes can be made to groups other than to transfer group ownership, or change the name and password of the group.
Joining a Group: Group Members
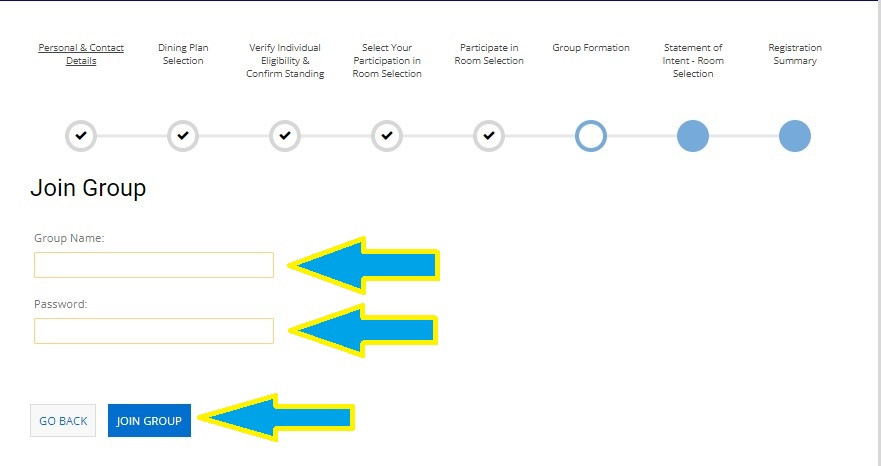
After clicking Join Group, as shown in the previous screen capture, enter the group name and password provided to you by your Group Leader. Then, click Join Group.
Note: The group password is case-sensitive.
Once you are part of a group, you will see a group summary page that shows whether or not the Group Leader has verified the group as well as the other group members who have joined and their profiles.
- If you are the Group Leader, you can change the group name and password, or transfer your Group Leader status to another member.
- If you are a group member, you have the option to leave the group. This action must be completed prior to the end of Room Selection Registration.
Once Registration is closed, no changes can be made to group membership.
Note: Remember that only the Group Leader will have the ability to make your housing selection during your appointment time, so your leader should be someone who the entire group feels comfortable with giving that authority, and someone who will be available during your appointment time to log in to the Housing Portal and make your group's selection.
Step 11: Statement of Intent
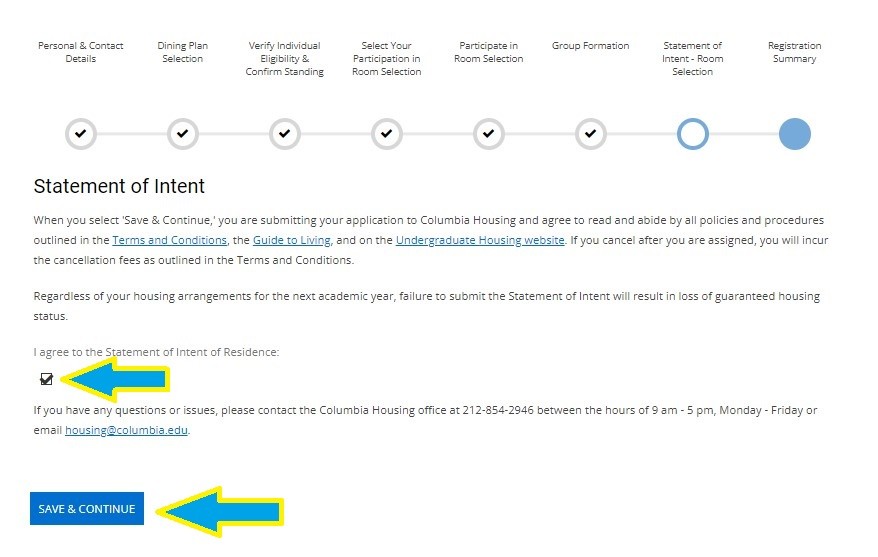
The last step in the application process is to digitally sign your Statement of Intent to participate in Room Selection.
For those selecting as part of a group, this step will not be available to you in the Housing Portal until your group is verified by your Group Leader.
If you intend to participate in Room Selection and live in the residence halls next academic year, click the checkbox labeled I agree to the Statement of Intent of Residence and then click Save and Continue.
Regardless of your housing arrangements for the next academic year, failure to submit the Statement of Intent will result in loss of Guaranteed Housing Status, so please complete this step if you wish to maintain your Guaranteed Housing status.
If you cancel after selecting your room, cancellation fees may apply.
If you need help during registration, contact the Housing team:
- 212-854-2946 (Monday - Friday 9:00 - 5:00)
- 212-854-2779 (After hours and weekends)
- [email protected]
